
BUILDING LINUX SERVERS: DHCP, DNS AND DS
Published:
Notebook for Building Linux Servers (DHCP, DNS, DS) Course.
TABLE OF CONTENTS
- TABLE OF CONTENTS
- INTRODUCTION
- 1. BUILDING DHCP SERVER
- 2. BUILDING DNS SERVER
- 3. CONFIGURING DYNAMIC DNS SERVER (DDNS)
- 4. BUILDING DIRECTORY SERVER
- 5. ADMINISTRATION OF DIRECTORY SERVICES
- 6. REAL WORLD SCENARIOS
INTRODUCTION
For this test environment, I am using headless Debian 13.2.0 (trixie) as the default OS for the DHCP and DNS servers, while the DS Server is using Red Hat Enterprise Linux 10.0. The virtualization solution I am using for this lab is Linux KVM (Kernel-based Virtual Machine). The configuration files are based on one of my test labs that runs on the 10.0.2.0/24 NAT network, called ServersNAT.
DHCP Server (hostname: dhcp1) uses 10.0.2.4/24, DNS Server (hostname: ns1) uses 10.0.2.5/24 and Directory Server (hostname: id1) uses 10.0.2.6/24 as the static IP addresses with example.com as domain name.
I have also added two clients, with Gnome Desktop Enviroment, within the same ServersNAT virtual-network: fedora-client and debclient. These clients can, also, be used to interact and access the GUI of Red Hat Identity Management (IdM), which is the software we will use for our Directory Service.
Here is the network topology of my virtualization configuration:
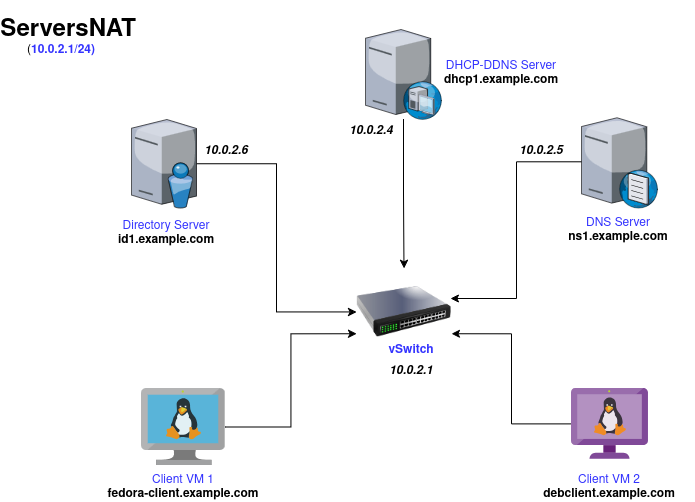
Figure: Network Topology for ServersNAT
This notebook and all of the included configuration files are designed for learning and testing purposes, and not for use in a production environment.
1. BUILDING DHCP SERVER
I have already created a Debian-based VM with FQDN, dhcp1.example.com with static IP: 10.0.2.4/32 to act as the DHCP Server for this network, ServersNAT.
For official documentation on installing kea packages, refer to: https://kb.isc.org/docs/isc-kea-packages .
1. Setup ISC-Kea reposiory:
First setup kea-3.0 repository in debain as:
curl -1sLf \
  'https://dl.cloudsmith.io/public/isc/kea-3-0/setup.deb.sh' \
  | sudo -E bash
Then install isc-kea as:
apt install isc-kea
2. Setup BuildingLinuxServer repository:
Now, make sure you are logged in as root to the Debian system. Access the ~ directory and clone this repository.
su -
cd ~ && git clone https://github.com/biplavpoudel/BuildingLinuxServer.git
cd BuildingLinuxSever
3. Configure Kea-DHCP4-Server
For kea-dhcp4.conf file, install the kea-dhcp4 server and then, copy the individual files to their respective locations. Backup the original configurations file first.
apt install isc-kea-dhcp4-server
systemctl disable isc-kea-dhcp4-server.service

mv /etc/kea/kea-dhcp4.conf /etc/kea/dhcp4.conf.bak
cp /kea/kea-dhcp4.conf /etc/kea/
Test the configuration now. Optionally, use journalctl for more in-depth system logs.
kea-dhcp4 -t /etc/kea/kea-dhcp4.conf

journalctl -u isc-kea-dhcp4-server.service
Fix any errors and start up the service:
systemctl enable --now isc-kea-dhcp4-server.service
systemctl status isc-kea-dhcp4-server.service
If green color is shown, you are good to go!
Ensure the server is listening on port 67 for incoming DHCP requests by checking all the open ports:
ss -tulnw
4. Update KVM’s NAT Network Connection
I am using a manually created NAT network called ServersNAT, in my KVM host, for all the VMs.
sudo virsh net-edit ServersNAT
So locate and remove the <dhcp> section inside <ip> element. Then re-activate the network as:
sudo virsh net-destroy ServersNAT
sudo virsh net-start ServersNAT
5. Renew lease on client VMs
Make sure you have isc-dhcp-client package installed.
sudo apt install isc-dhcp-client
Then renew the DHCP lease using:
sudo dhclient -r
sudo dhclient
6. Use Postgressql as Lease Database
Ensure you build and compile the binary package with switch -D postgresql=enabled . For more info, visit: https://kea.readthedocs.io/en/kea-3.0.2/arm/install.html#building-with-postgresql-support
git clone https://gitlab.isc.org/isc-projects/kea.git
cd kea
git checkout 3.0.2
meson setup build -D postgres=enabled
meson compile -C build
meson install -C build
After setup, update /etc/kea/kea-dhcp4.conf as:
"database": {
    "type": "postgresql",
    "host": "192.168.254.26",
    "name": "kea_db",
    "user": "kea_user",
    "password": "****"
}
In this example, I have set up PostgreSQL database in my KVM host so I used my host IP 192.168.254.26.
Visit this link to configure the database: https://kea.readthedocs.io/en/kea-3.0.2/arm/admin.html#pgsql-database-create
In the host, modify /var/lib/data/pgsql/pg_hba.conf to include:
host kea_db kea_user 10.0.2.4/32 md5
Add a firewall rule to allow incoming connection to 5432 port as:
sudo firewall-cmd --zone=libvirt --add-port=5432/tcp --permanent
Then test from dhcp1 as: psql -h 192.168.254.26 -U kea_user -d kea_db
Then intialize database as:
kea-admin db-init pgsql \
  -h '192.168.254.26' \
  -n 'kea_db' \
  -u 'kea_user' \
  -p '****'
Took me a long time to figure it out!!!
7. Benchmarking DHCPv4
Install isc-kea repository in your client VM and then install perfdhcp package:
sudo apt install isc-kea-perfdhcp
Ensure the isc-kea version matches between client and server.
Now to benchmark, run perfdhcp against the kea-dhcp4 server 10.0.2.4:
perfdhcp 10.0.2.4
To specify number of 4-way exchanges (DORA) for second, use:
perfdhcp -r <number_of_exchanges> 10.0.2.4
8. Run Kea-DHCP4 Server as Container
Create a network, say network1, with:
podman network create network1
podman network inspect network1
Then we will pull the latest ubuntu image, set its network and MAC address and run it as a privileged container:
podman create -ti --privileged --net=network1 --mac-address 1a:1b:1c:1d:1e:1f ubuntu
You can rename container, in my case it was peaceful_sutherland; then check it and run as:
podman rename peaceful_sutherland kea-1
podman container ls -a
podman container start kea-1
Install necessary packages externally using:
podman exec kea-1 apt install curl iputils-ping git net-tools vim -y
To enter into the container’s /bin/bash, use:
podman exec -it kea-1 /bin/bash
Since systemctl is not running inside the kea-1 container, after installing isc-kea packages and configuring kea-dhcp4.conf file, you can use:
podman exec kea-1 /etc/init.d/isc-kea-dhcp4-server status
podman exec kea-1 /etc/init.d/isc-kea-dhcp4-server start
Rest of the steps are pretty similar as running kea-dhcp4-server in VM.
2. BUILDING DNS SERVER
I have created a Debian-based VM with FQDN, ns1.example.com with static IP: 10.0.2.5/32 to act as the DNS Server for this network, ServersNAT.
1. Installation of BIND Packages
Install the necessary bind9 (Berkeley Internet Name Domain) packages:
apt install -y bind9 bind9-doc dnsutils
systemctl status bind9.service
Installation and configuring process is different for rpm-based distros like RedHat, CentOS and Fedora.
dnf install bind bind-utils
systemctl status named
systemctl start named

vim /etc/named.conf     # in debian, it is in /etc/bind/named.conf
2. Testing BIND9 Daemon
To check if bind9 daemon is repsonding or not, we can query NS records for root domain “.” using loopback address as DNS Server:
dig @127.0.0.1 . NS
3. Configuration of BIND9 daemon
Now, in /etc/resolv.conf change the nameserver to point to this VM’s IP:
nameserver 10.0.2.5
Ensure the /etc/kea/kea-dhcp4.conf in dhcp1 (10.0.2.4) correctly points to 10.0.2.5 for DNS in option-data/domain-name-servers key.
Since we want to mostly work in IPv4, we will direct named daemon to listen on IPv4 sockets only.
Modern Debian system uses /etc/default/named for service runtime options, so open and modify the file:
sudo nano /etc/default/named
Locate OPTIONS line and append -4.
OPTIONS="-u bind -4"
Then, we run:
systemctl restart named
To confirm BIND no longer listens on IPv6 sockets:
ss -tulpn | grep named
It should be noted that named.service is an alias for bind9.service.
4. Configuration of Forward and Reverse Lookup Zones
After copying named.conf.* into /etc/bind, create a new directory /etc/bind/zones and copy db.* files there.
cp BuildingLinuxServer/bind-files/named.conf.* /etc/bind/
cd /etc/bind
mkdir zones && cd zones
cp ~/BuildingLinuxServer/bind-files/db.example.com .
cp ~/BuildingLinuxServer/bind-files/db.2.0.10 .
5. Verifying Zones and Testing DNS Server
You can check zone files using:
named-checkconf
To check individual zone file:
named-checkzone example.com /etc/bind/zones/db.example.com
named-checkzone 2.0.10.in-addr.arpa /etc/bind/zones/db.2.0.10
To check all zones at once:
named-checkconf -z
3. CONFIGURING DYNAMIC DNS SERVER (DDNS)
The Kea DHCP-DDNS Server (also called D2) conducts the client side of the Dynamic DNS protocol, on behalf of the DHCPv4 (kea-dhcp4) and DHCPv6 servers (kea-dhcp6).
The DHCP server constructs DDNS update requests, known as NameChangeRequests (NCRs), based on DHCP lease change events and then post them to D2. D2 then attempts to match each request to the appropriate DNS server and carries out the necessary conversation with those servers to update the DNS data.
1. Installation of DDNS Packages
Install kea-dhcp-ddns server as:
apt install isc-kea-dhcp-ddns-server
systemctl enable --now isc-kea-dhcp-ddns-server.service
Backup the existing files in /etc/kea and copy the files from the repo’s /kea-files/ddns-config-files to the /etc/kea directory.
Validate the configurations for both:
kea-dhcp4 -t /etc/kea/kea-dhcp4.conf
kea-dhcp-ddns -t /etc/kea/kea-dhcp-ddns.conf
2. Update BIND Configuration
Now let’s head over to DNS server, ns1 (10.0.2.5) and add the line allow-update { 10.0.2.4; }; in both forward and reverse lookup zones in /etc/bind/named.conf.local.
Here is the file:
zone "example.com"
	{
	type master;
	file "/etc/bind/zones/db.example.com";
	allow-update { 10.0.2.4; };
	};

zone "2.0.10.in-addr.arpa"
	{
	type master;
	file "/etc/bind/zones/db.2.0.10";
	allow-update { 10.0.2.4; };
	};
This is unsecure for production as non-authenticated updates are being sent over to DNS from DHCP, without encryption using TSIG keys.
3. Disabling AppArmor for BIND
Debian ships with an AppArmor profile for named that prevents BIND from writing to zone files located under /etc/bind/zones/.
For Dynamic DNS (DDNS) to work, BIND must be allowed to modify its zone files and create .jnl journal files.
For simplicity, we will disable the Apparmor profile for bind daemon.
First, let’s list AppArmor profile belonging to bind daemon:
ls /etc/apparmor.d | grep named
# >> usr.sbin.named
Then diable the AppArmor profile with:
ln -s /etc/apparmor.d/usr.sbin.named /etc/apparmor.d/disable/
apparmor_parser -R /etc/apparmor.d/usr.sbin.named
Restart the AppArmor and BIND:
systemctl restart apparmor
systemctl restart named
4. BUILDING DIRECTORY SERVER
I have decided to use a RedHat VM as DS Server (10.0.2.6) with fqdn: id1.example.com.
To build a Directory Service, we need to install RedHat Identity Management (IdM) as our centralized IAM software solution.
dnf install ipa-server
NOTE: Since all IdM server packages are now available in standard AppStream repository, we no longer need to enable it with: dnf module enable idm:DL1 && dnf distro-sync command.
Now to configure IPA (Identity, Policy and Audit), we run:
ipa-server-install
Here we setup FQDN, Hostname, Kerberos Realm, Directory Manager, IPA Admin, self-signed CAs and many more.
1. Copy DNS Records from DS Server to DNS Server
We need to copy the generated DNS records inside /tmp/ipa.system.records.0v1xmmd3.db/ to the ns1.example.com DNS server.
So, from id1.example.com VM, we run:
rsync /tmp/ipa.system.records.0v1xmmd3.db user@10.0.2.5:/home/user
Then inside the ns1.example.com VM, we append the records to /etc/bind/zones/db.example.com using » (append redirection operator):
cat /home/user/ipa.system.records.0v1xmmd3.db >> /etc/bind/zones/db.example.com
printf "\n" >> /etc/bind/zones/db.example.com
To check and validate our zones, run:
named-checkzone example.com /etc/bind/zones/db.example.com
And restart the bind9 service:
systemctl restart named
2. Open Firewall Ports in DS Server
We need to open these TCP and UDP ports in the firewalld daemon:
TCP Ports:
80, 443: HTTP/HTTPS
389, 636: LDAP/LDAPS
88, 464: kerberos
UDP Ports:
88, 464: kerberos
123: ntp
The commands to add the above TCP/UDP ports permanently are:
firewall-cmd --add-port=80/tcp --add-port=443/tcp --add-port=389/tcp --add-port=636/tcp --add-port=88/tcp --add-port=464/tcp --permanent
firewall-cmd --add-port=88/udp --add-port=464/udp --add-port=123/udp --permanent
firewall-cmd --reload
firewall-cmd --list-ports
Also backup the CA certificates stored as cacert.p12, inside root:
mkdir ~/backup
cp cacert.p12 ~/backup/
5. ADMINISTRATION OF DIRECTORY SERVICES
To use IPA (Identity, Policy and Audit) tools, we need a Kerberos Ticket, which we can get using:
kinit admin
1. Managing Users
1. Add a User
To add user with password and bash login shell:
ipa user-add hk --first Harry --last Kane --manager biplav --email=harry@gmail.com --homedir=/home/hkane --password --shell=/bin/bash
The resulting prompt and output is displayed as:
Password:
Enter Password again to verify:
---------------
Added user "hk"
---------------
  User login: hk
  First name: Harry
  Last name: Kane
  Full name: Harry Kane
  Display name: Harry Kane
  Initials: HK
  Home directory: /home/hkane
  GECOS: Harry Kane
  Login shell: /bin/bash
  Principal name: hk@EXAMPLE.COM
  Principal alias: hk@EXAMPLE.COM
  User password expiration: 20251208142811Z
  Email address: harry@gmail.com
  UID: 842600008
  GID: 842600008
  Manager: biplav
  Password: True
  Member of groups: ipausers
  Kerberos keys available: True
2. Find Information on a User
To find information on a user, we can use:
ipa user-find bip
The resulting output as:
--------------
1 user matched
--------------
  User login: biplav
  First name: Biplav
  Last name: Poudel
  Home directory: /home/biplav
  Login shell: /bin/bash/
  Principal name: biplav@EXAMPLE.COM
  Principal alias: biplav@EXAMPLE.COM, bp@EXAMPLE.COM
  Email address: bp@example.com
  UID: 842600006
  GID: 842600006
  Account disabled: False
----------------------------
Number of entries returned 1
----------------------------
For information on all users:
ipa user-find --all
3. Edit existing User Record
To edit user information, we can use:
ipa user-mod <user_login> [--addattr/--rename/--set-attr/...]=<new_value>

ipa user-mod hk --rename=hkane
ipa user-mod hkane --email=hkane@gmail.com
4. Delete a User
To delete a specific user, we run:
ipa user-del hkane
5. GUI Sample
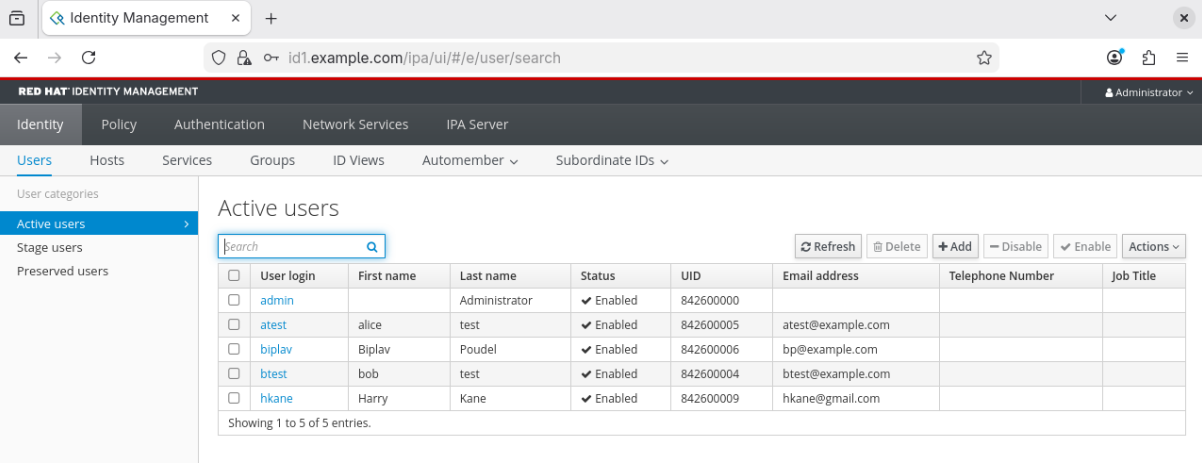
We can use GUI to manage users by entering url for the id1 server in any browser, which in my case, is: https://10.0.2.6, that resolves to id1.example.com, and logging in as IPA Admin.
2. Managing Groups
1. Find All Groups
To find all groups in the IdM Directory, we run:
ipa group-find --all
2. Add Group
Similar to adding users, we can add groups like:
ipa grobashup-add Developers --desc="Programmers"
Output as:
------------------------
Added group "developers"
------------------------
  Group name: developers
  Description: Programmers
  GID: 842600010
3. Add a User to a Group
To add a user to a group, we use:
ipa group-add-member Developers --users=hkane
Output as:
Group name: developers
Description: Programmers
GID: 842600010
Member users: hkane
-------------------------
Number of members added 1
-------------------------
4. Remove User from a Group
To remove specific user, we run:
ipa group-remove-member Developer --users=hkane
5. Nesting Groups
To add an existing member group to a group, we run:
ipa group-add-member Developers --groups=Engineers
Output:
  Group name: developers
  Description: Programmers
  GID: 842600010
  Member users: hkane
  Member groups: engineers
-------------------------
Number of members added 1
-------------------------
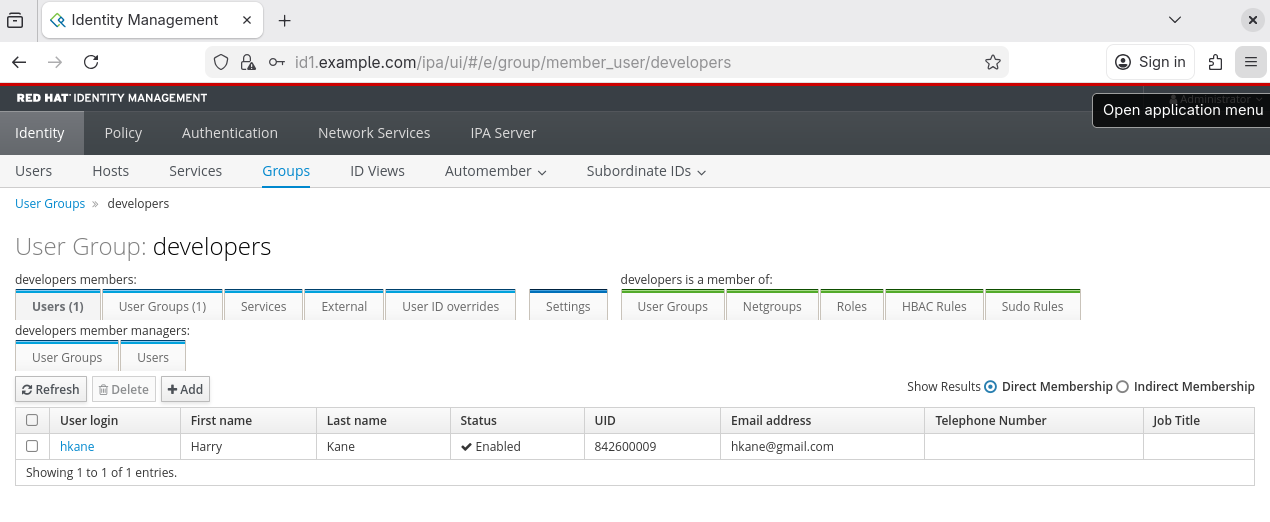
6. GUI Sample
Inside the User Groups/developers in GUI, we can see:
3. Managing Hosts
In this lab, we are particularly concerned with managing servers, not client VMs.
1. Find all available Hosts
To find available systems associated with ipa, we run:
ipa host-find --all
2. Add Hosts
We can add hosts using FQDN if the host has corresponding DNS A/AAAA record in the network’s DNS Server, which in our case is ns1.example.com.
ipa host-add dhcp1.example.com
ipa host-add ns1.example.com
3. Delete a Host
To delete a specific host, just run (for example):
ipa host-del ns1.example.com
4. Modify a pre-existing Host
To modify an exisiting host,
ipa host-mod dhcp1.example.com --desc="DHCPv4 server" --os=Debian-13
Output:
  ---------------------------------
  Modified host "dhcp1.example.com"
  ---------------------------------
    Host name: dhcp1.example.com
    Description: DHCPv4 server
    Operating system: Debian-13
    Principal name: host/dhcp1.example.com@EXAMPLE.COM
    Principal alias: host/dhcp1.example.com@EXAMPLE.COM
    Password: False
    Keytab: False
    Managed by: dhcp1.example.com
4. Working with Policies (like Kerberos Ticketing)
1. Get Kerberos Ticket Policies
To see kerberos ticket policy for users and admin, we can run:
ipa krbtpolicy-show
ipa krbtpolicy-show admin
2. Update Ticket Policy
Before: (Same for admin and non-admin users)
Max life: 86400
Max renew: 604800
Now let’s modify max life from 24 hours to 1 hour for admin:
ipa krbtpolicy-mod admin --maxlife=3600
ipa krbtpolicy-show admin
Now, the output for admin is:
Max life: 3600
Max renew: 604800
3. Reset Policies
To reset to default values, we run:
ipa krbtpolicy-reset admin
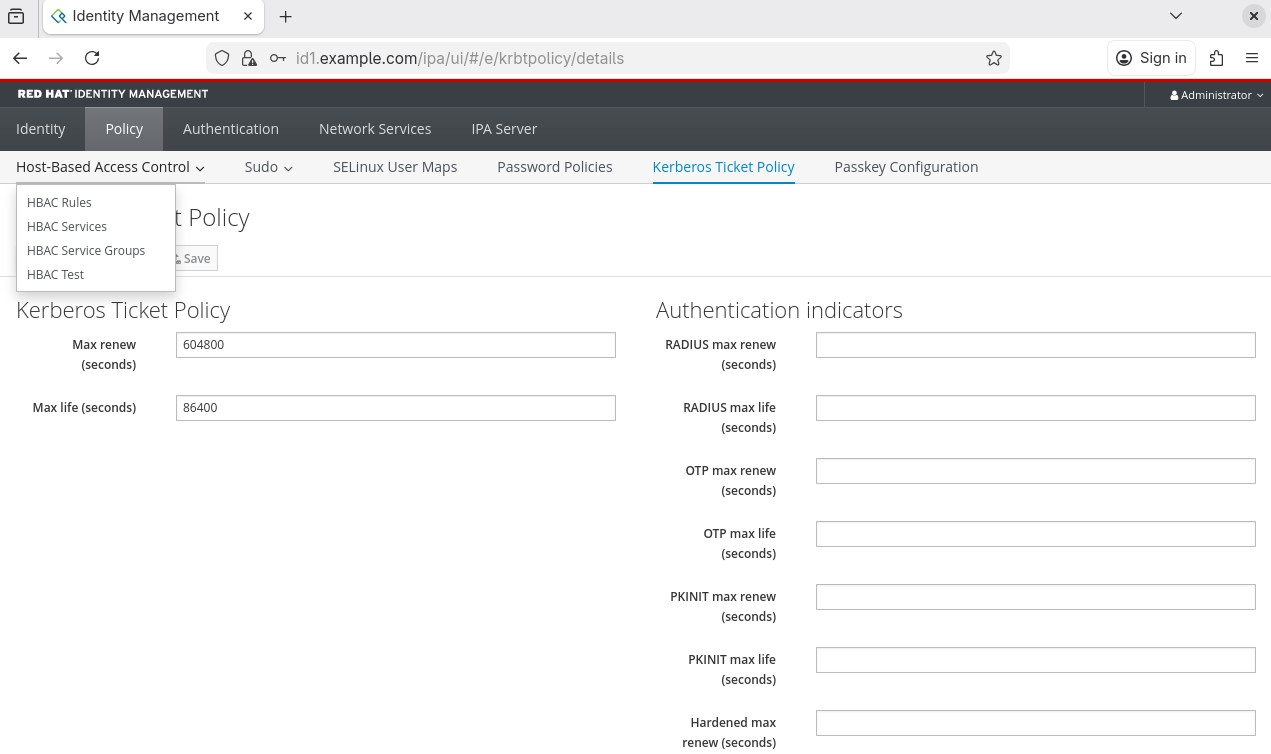
4. GUI Sample
We can also use GUI to access and modify policies for users:
5. Connecting Client to Directory Service:
In Fedora-based client VM, inside the same network as ns1, dhcp1 and id1 servers, we need to install freeipa-client package instead of RedHat’s ipa-server:
dnf install freeipa-client
Now to setup the IPA client, with home directory for users assigned from IdM, we run:
ipa-client-install --mkhomedir
6. Setting up User Accounts on Client:
- If you are using Gnome Desktop Environment in Fedora Client, you can head over to : Settings > System > Users and unlock the settings.
- Choose Enterprise Login and add Domain (example.com), Username and Password for users from Directory Server.
- If you are unsure, you can find all added users by running
ipa user-find --allin the bash shell of directory service,id1.example.com. - After the user account setup, logout from current user and login as the new user.
6. REAL WORLD SCENARIOS
1. Creation of IPA Sysadmin to replace default IPA Admin
It’s better to use a different admin account with all the administrative rights, like sysadmin, for IPA administration and servers management, instead of a default keroberos admin and/or root account. Also it is more secure to use SSH keys instead of passwords for connecting to all servers.
So, lets ssh into dhcp1.example.com and add sysadmin to sudoers group:
adduser sysadmin
usermod -aG sudo sysadmin         # debian,ubuntu
usermod -aG wheel sysadmin        # redhat,fedora,centos
Repeat this step with all the hosts.
2. Passwordless authentication to remote servers
Now, we create a ssh keypair and use the .pub key to authenticate with all servers.
ssh key-gen
ssh-copy-id sysadmin@10.0.2.4
ssh-copy-id sysadmin@10.0.2.5
ssh-copy-id sysadmin@10.0.2.6
ssh-copy-id is a SSH wrapper that copy/paste the generated ssh public key to ~/.ssh/authorized_keys for each server.
3. Tilix for tiling terminals
We can use tilix for managing multiple terminal sessions under a single window. Install in a Debian-based client using:
apt install tilix
You can create horizontal split with: Ctrl+Alt+R and vertical split with: Ctrl+Alt+D
and move between them using: Alt+Arrows
4. Add sysadmin account to IPA
Inside id1.example.com DS Server, run:
kinit admin
ipa user-add sysadmin
ipa group-add-member admins --user=sysadmin
5. Tmux for multiple terminal sessions in a single SSH Connection
Tmux can be be used to manage persistent, multi-terminal sessions within a single SSH Connection. It can be installed with:
apt install tmux -y
Run tmux within a ssh session and use Ctrl+B + <specific commands> to split, navigate and switch panes/windows.
Follow the guide: https://www.redhat.com/en/blog/introduction-tmux-linux for some tips.
Additional Notes
- For this test environment I am using Debian 13 (trixie) as a server for DHCP and DNS (with no GUI) with NAT for inter-VM communication.
- I have used separate Debian VMs for DHCP and DNS using KVM.
- The configuration files are based on one of my test labs that runs on the
10.0.2.0/24NAT network. - DHCP Server uses
10.0.2.4/32and DNS Server uses10.0.2.5/32 - To use dhcp relay, you can use either
OPNSense,pfSenseor similar tools. Just attach both networks to the VM and set static IPs 10.0.2.220 and 192.168.122.x/32 for both networks respectively. Look intokea-files/kea-dhcp4.conf.dhcprelayfor IP configurations. You still need to configure firewalls in the OPNSense VM. - Sometimes, the client VMs aren’t leased IPv6 addresses from kea-dhcp6 server. The existing IPv6 addresses are either link-local only or from SLAAC addresses (temporary and stable/EUI-64) assigned by router. To remedy that, run
sudo dhclient -6 -v <interface-name>. Very confusing!!